Monday, August 9, 2010

10 Tips to Make Perfect Cupcakes

TLC Cooking "10 Tips to Make Perfect Cupcakes"

Here are some very standard, but very important baking tips for cupcakes! Posting a helpful link counts as a post, right?

Forgive me, I have many, many pictures on my camera that are yet to be uploaded. Most of them are "real food," too! While my primary kitchen-related pastime is baking, I do occasionally eat actual food, and I believe all that is worth sharing as well! (Plus, if it's cooked in an oven, it's technically a "baked good" anyway, right?) More to come.

I have a huge list of baking projects that I plan to tackle in the next few months. With the fall semester just around the corner, classes, labs, research, orchestra and other extracurriculars will definitely cut into my baking time, but with the help of a few of my favorite friends and baking assistants, I hope to manage baking with life.

I am currently intrigued with the possibility of opening my own bakery one day. While I currently do not see myself ever waking up at 4 AM to start baking, the possibility is, as I said, intriguing. Maybe if I cannot find a job as a "real" chemist upon graduation, I can find a part-time job at a bakery! Or, maybe I'll do what most people do, and just go to graduate school to prolong the real world job concept.

Bakery-owner or not, I still have a lot to learn, and share. To list a few things I would like to make by December...

Cupcakes! And not just any cupcakes, but red velvet, carrot, lemon, banana, chocolate, vanilla, and many more!

Frostings! Because they go really well with cupcakes. Buttercream, cream cheese, ganache, you name it!

Fillings! Because they are delicious inside of cupcakes. Lemon curd, chocolate ganache, custard, they're not just for doughnuts anymore!

Gnocchi! Because it is delicious, even if it is not a cupcake. And because I don't need to buy a pasta machine to make it!

Adorable shortbread cookies! Because they will make great Christmas gifts, and because I did buy all those cookie cutters for a reason now, didn't I?

And, of course, anything else that just strikes my fancy.

Stay tuned!

Sunday, August 1, 2010

Soft Pretzels

As soon as I saw this recipe on smittenkitchen, I knew that I absolutely had to try it. So, I immediately showed the recipe (mainly, the pictures) to my baking assistant/muscle for dough-kneading boyfriend, and his reaction was, essentially, "Pretzels! You should make those!"


Well, we were supposed to make them yesterday, but then we got distracted, I fell asleep, and, well, it basically just wasn't going to happen after that. So, this morning, making these pretzels was the only thought in my mind.


I have two cookie sheets, so I put one on the top rack of the oven, and one on the bottom rack. I actually took the tray on the top rack out of the oven after about 7 minutes, because the pretzels were golden  then moved the one from the bottom rack to the top rack and baked it for the total 12 minutes. My pretzels were on the small side, so I would imagine larger ones would need the full 15 minutes. Also, next time, I would not place the just-boiled pretzels directly back on the parchment paper. In the first batch (which only baked for 7 minutes), a couple of the larger pretzels seemed slightly soggy on the underside. They were, of course, still delicious. Jake preferred the fully-baked ones, whereas I preferred the slightly under-baked ones.


I believe Jake approved.

Overall, though, I doubt I will be buying a soft pretzel from that stand at the mall again. These were perfection, sprinkled with a bit of kosher salt prior to baking, and served warm-from-the-oven with some spicy brown mustard.


Soft Pretzels
Recipe from Deb at smittenkitchen.com, adapted from Martha Stewart

I went with Deb's suggestion of just using a wooden spoon to mix the dough, rather than the electric mixer. I find using a spoon and some good ol' fashioned arm muscle (read: Jake's good ol' fashioned arm muscle) to be much faster and easier, and involve less cleanup. The more I run my dishwasher, the higher my electricity bill seems to be.

Makes 16 full-sized or 32 miniature (I got about 24, some larger than others)


2 cups warm water (100°F to 110°F)
1 tablespoon + 2 tablespoons sugar
1 packet active dry yeast
5 to 6 cups all-purpose flour, plus more for dusting
1 tablespoon salt
2 teaspoons canola or other neutral oil
1/4 cup baking soda
1 large egg
Coarse or pretzel salt

Vegetable-oil cooking spray


1. Pour warm water and 1 tablespoon sugar into bowl of electric mixer fitted with a dough hook* and stir to combine. Sprinkle with yeast, and let sit 10 minutes; yeast should be foamy.


2. Add 1 cup flour to yeast, and mix on low until combined. Add salt and 4 cups more flour, and mix until combined, about 30 seconds. Beat on medium-low until dough pulls away from sides of bowl, about 1 1/2 minutes. Add another 1/2 cup flour, and knead on low 1 minute more. If dough is still wet and sticky, add 1/2 cup more flour (this will depend on weather conditions); knead until combined, about 30 seconds. Transfer to a lightly floured board, and knead about ten times, or until smooth.


3. Pour oil into a large bowl; swirl to coat sides. Transfer dough to bowl, turning dough to completely cover all sides. Cover with a kitchen towel, and leave in a warm spot for 1 hour, or until dough has doubled in size.


4. Heat oven to 450°F. Lightly spray two baking sheets with cooking spray (parchment paper, ungreased, also works). Set aside. Punch down dough to remove bubbles. Transfer to a lightly floured board. Knead once or twice, divide into 16 pieces (about 2 1/2 ounces each) or 32 if making miniature pretzels, and wrap in plastic.


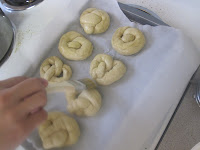
5. Roll one piece of dough at a time into an 18-inch-long strip. [I find the pretzels much easier to roll on an unfloured board, oddly enough, but see what works for you.] Twist into pretzel shape; transfer to prepared baking sheet. Cover with a kitchen towel. Continue to form pretzels; eight will fit on each sheet (you may need a third sheet if making miniatures). Let pretzels rest until they rise slightly, about 15 minutes.


6. Meanwhile, fill large, shallow pot with 2 inches of water. Bring to a boil. Add baking soda (and step back, it foams up quickly) and remaining 2 tablespoons sugar. Reduce to a simmer; transfer three to four pretzels to water. Poach 1 minute on each side. Use slotted spoon to transfer pretzels to baking sheet. Continue until all pretzels are poached.


7. Beat egg with 1 tablespoon water. Brush pretzels with egg glaze. Sprinkle with salt. Bake until golden brown, 12 to 15 minutes. Let cool on wire rack, or eat warm. Pretzels are best when eaten the same day, but will keep at room temperature, uncovered, for two days. Do not store in covered container or they will become soggy.


* These days, I mix all of my bread doughs by hand, with a wooden spoon. I find it a fantastically easy process, and not very hard to stir by hand. No need to mix for several minutes, just a minute or so after it looks combined. To save even more dishes, I rinse out the bowl, oil it and use it for proofing the dough. And you thought making bread wasn’t simple!